Blog Navigation:

2011/08/19

The Basics of Composition

Well, I’ve been creating a “Friday Art” post on both Facebook and Google+.  It’s been a lot of fun, but last week I didn’t post one, partly because I just had gotten back from a trip to Texas.  Also partly because I had told a friend that I’d post this and it was getting too big and uncontrollable.  
So, I think I’ve got it under control now.  Hope you enjoy it.

Topic: How does informal composition work?

A formal composition balances all of its elements symmetrically—often with a center of interest in the center of the composition, but not always.  If an object sits on the right side an object of equal weight sits on the left side.  
Chancellor Séguier by Charles Le Brun

Informal composition radically moves the elements to balance without symmetry. 
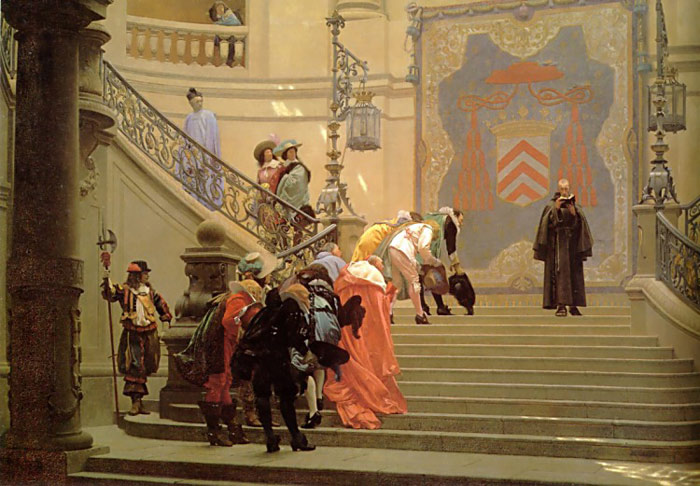
The Grey Cardinal by Jean-Léon Géróme

Some do not understand how this works.  How can an informal composition look good if its not organized?  The secret is... it is organized, but not in a 1+1=2 sort of way.  Let me explain it to you.  It’s for your own good.  Really.  Some may dislike asymmetrical compositions merely because they don’t understand them.  This explanation should give you some visual “higher math” to feel better about most paintings, illustrations, and movies.  (Did you know that movies use a lot of informal shots?  It’s going to bother you now, isn’t it?  Well, I’d better get on with the explanation then....)

This is a formal composition:
The center of interest (the boy) is in the center of the picture.  The house and the trees on the right balance the tree on the left.  The path and the bridge and the trees behind the boy are all in the center of the picture.  

Yes, all you math-heads, though the tree doesn’t exactly mirror the house, though the path leans one way and middle trees behind lean another way, and though the bridge is at an angle, this is most definitely a formal composition.  Because of the variation some may think of it as informal; however, this formal composition merely uses informal elements for variety.  They still are arranged into a formal composition.

What if we took the center of interest and moved him off to one side?  (Yes, it’s just called the “center” of interest.  It doesn’t have to be in the center.  You just have to make people look at it like it is.)
He looks awfully lonely and the other side look really empty.  How could we make it look better?  I’m glad you asked.  Let’s get a little abstract.

First you need to know that everything in a picture does something for the composition.  I’ve color-coordinated some of these abstract elements and we are going to step through them quickly to tell you how they work.
The red object is our center of interest.  I like to call elements like these target objects, because they attract attention.  The blue object is what I call an arrow object.  The green object is a frame object.  And the yellow object is a halo object.  (Appropriate, eh?)

Since those colors and names do not tell you much, here’s more information on each:

Arrow objects point to stuff.  Ideally, they point to your target object.  They can point like arrows, or if they have a front they can face in a direction.  Arrow objects do the bulk of the work making our eyes move around in a painting.

Halo objects form a little halo around the target object to attract attention subtly.  They can be light, golden, dark, feathery, solid, or just about anything.  They circle around the target object, essentially saying, “Inside here is something special!”

Frame objects stop movement from leaving the composition.  This framing object is like a large halo, but instead of indicating something special, it says, “Stop!  Look back toward the target object....”  Sometimes frame objects act like halos, and other times they act like arrows, but they do a unique job in the picture.

So getting back to my picture with the little boy, what could I do to spice it up a bit?

First, I’m going to put in a large heavy arrow object on the opposite side from the boy in the picture.  Notice that as a whole—the bridge, the trees, the house, and the grass by the river—they form an arrow pointing to the boy.  Also, notice that both the house and the bridge seem to be facing in the boy’s direction.  These are both examples of how arrow object’s work, both as a mass and as individual elements.

Notice how this effectively shifts our attention from the big empty side to the boy.  In fact, it’s so strong, we tend to look off the left of the picture.  The target object, strong as it is, cannot effectively counteract the strong leftward momentum in the picture.

Second, I’m going to add in the halo object behind the boy.  This halo object isn’t the strongest use.  Many times artists use halos that compliment or contrast the target object.

Notice that while the halo object helps, it doesn’t solve the entire problem.  The left side of the picture still needs help.

Third, I use a frame object!  This effectively stops our eye from wandering off the page.

Oh, and last but not least... here’s the path.  Just so he’s not floating on air.  We wouldn’t want that, now would we?  And believe it or not.... the path actually compliments the composition further, but that’s a more advanced lesson.

In fact, this art moment just scratches the surface of how informal composition works.  Fine art, comic books, and movies subtly use value, color, space, and action in many ways to balance informal compositions.  The next time you see an informal composition, try to figure out how it works.  You might surprise yourself!  Email me about your findings.  Then I can enjoy reading your thoughts!

2011/03/16

Step-by-Step Imaginair

I see many views that I want to paint, but don't have the time to paint.  Some sights are too glorious to forget and those I try to memorize and paint at the earliest possible opportunity!  These I call my imaginairs.  They are plein airs that I paint from memory.

Early monday morning my dad had car trouble, and on my way out to save the day, the sun rose over the bay.  I saw it from the top of a bridge.  I normally don't have time to capture something like this so fast, but yesterday I had some time so I painted away.  Hope you enjoy!


Step 0:  Remember everything that I saw.  (This image is really I cheat, but there's no other way to visualize this step.  This is the final image faded and blurred to approximate how memory looks.)


Step 1:  Outline the large shapes.  Every art piece needs a plan.  We put the idea of the finished piece to paper as soon as possible.  This gives us something to evaluate.  (Instead of evaluating a blank sheet of paper.)


Step 2:  Blocking in major shapes.


Step 3:  I realized that I made my trees too large for the composition that I wanted.  So I squished the composition to give more sky for the cloud effects that I was going to put there.


Step 4:  I should be just blocking in still, but I got carried away with the tree tops.  I will regret that later.


Step 5:  All blocked in!


Step 6:  Stretching the composition to bring the trees closer to us and still have a large sky.


Step 7:  Detail in the sky and tree tops.


Step 8:  Making the colors darker and more vibrant.


Step 9:  Finished detail.

I hope you enjoyed this as much I enjoyed the original sunrise!  There is something about the real thing that I cannot replicate.  But that's part of the thrill.  God created a magnificent creation full of complication and detail.  In observing and replicating it, we do not attempt something that we can easily do, but rather we attempt something that is so beyond our ability as to be unthinkable.  May we rejoice with God over His wisdom and creative power.

2011/02/21

New Sea Sketch

A Wide Gulf
February 21, 2011
plein air sketch

Some people have asked me if I've updated my blog.  I tell them that it's more like a pseudo-portfolio.  But just for them, here's a sketch that I just made at my grandpa's condo.  The gulf is so large and magnificent that I had to paint it in a way that engulfs the figure in the foreground.  The colors glowed beautifully in late afternoon, so I took fifteen minutes and sketched out what I saw.  Hope you enjoy.

2010/12/29

Young Artists

Often young artists will ask me to critique their work.  I enjoy doing so and try to use the critique to teach them some things about art that they might not know.  Every once in a while an artist comes by with an outstanding work of art.

Such an amazing painting landed in my inbox last week by a fellow collaborator.  He asked me to critique it, but I could find little wrong with it.  So I critiqued the little there to fuss about, and asked if I could post both his artwork and my critique.  It's a great example of where I hope all my artistic friends will be in the future!


For finished piece click here!


First of all, let me commend you on your draftsmanship.  Beautiful work.

Ok, I have three levels of art criticism: metaphor, representation, and aesthetics.  Because you aren't really saying anything with this particular piece, we can throw out the first level.  However, I will note that the greatest works of in the history of mankind all had a message or purpose outside of themselves.  So while we do create artwork to better ourselves, we ultimately want to make something meaningful outside of practice or personal achievement.

On the representational level, I have little to criticize.  You have captured the light in space in a believable way.  I love the light falloff of the large earth-like planet.  The detail, color, and value of the land, water, and atmosphere masses are very believably painted.  Also, the larger moon's light falloff, combined with the shadow of the planet is beautiful.

I would have two criticisms.  The first deals with the falloff of the little moon.  Though a little moon would naturally have a smaller falloff, that falloff would be proportionately the same.  Thus the little moon looks more like a round hole in the picture.  If you give it just a little more falloff and a whiter highlight, it should be perfect.

The second issue has to do with gravity and the large moon.  Perhaps it's the placement of the moon, but it can look like the moon is sitting on the surface of the planet.  In fact, with the small moon in the light side, we might wonder if the these orbiters really have that much of an orbit.  Perhaps it's the value and color: the planet being very bright and thus seemingly close to us, and the moon looking darker and more neutral and thus looking farther from us.  Perhaps the large moon just rolls around on the surface.  (Ok, so maybe I'm exaggerating a little now......)  If you created some space atmosphere in between the planet and the moon, pushing the planet back in space and pulling the moon out toward us, that would solve the problem.  Or you could brighten the moon and darken the planet.  Or you could make another orbiter, which is obviously out in space, maybe on the other side of the composition.  Or you could introduce rings to the planet in such a way as to show that they have distance from the planet.  Or you can try to do all of the above.  Just be sure that you save a layered version of this picture, and be subtle with your spatial enhancing techniques, whatever you do.

On the aesthetic level, again I have little to criticize.  The color is very good, beautiful in fact.  Your use of value is stunning.  Compositionally, this is very strong.  You have placed your planet/moon cluster at about the 2/3 or 3/5 section of the painting.  Your bright blue star balances the composition nicely.


Since the critique, Dieki implemented my suggestions.  You can see his finished piece here.

Not all of the artists I critique are as skilled as Dieki, but I enjoy critiquing them, all the same.  If you want to share one of your paintings or sketches or get input on them, be sure to email me!  Happy painting!

2010/10/19

An artist off to a film festival?

Well, this has been a very exciting year!  I have learned a lot and have grown in my artistic repertoire.  

In just a week I’ll be headed off to the San Antonio Independent Christian Film Festival.  I've been watching this festival with great interest since it started back in 2004.  It's a dream come true to go out there and participate in the festival.  I especially look forward to meeting with some of my new found film friends.  

One of these friends is named Mike Dornbirer, and he’s made a movie called The Free Ride.  I highly recommend this film, not just because it’s got a great message, but because I did a sky replacement for it!  The movie made it into the festival, so I am very excited to see some of my work on the big screen!  If you watch it, look for the moon.  That’s my sky replacement!  Go here to check out Sanctum Entertainment’s website.


A still from The Free Ride


I’ll also visit with John Moore and Johnny Reighard, two filmmakers from Heumoore.  I’ve been working with them on artwork for their next film, Ace Wonder.  The movie should give many Christians a lot of good excitement and fun with a thought-provoking message.  Check out Ace Wonder’s website for more details.  If you look hard enough, you'll see some of my artwork in one of the trailers.


A still from Ace Wonder


Well, speaking of artwork, I think I’m going to get back to work now…

2010/05/01

Illustrated Portraits

An illustrated portrait is a portrait that has illustrated elements in the painting.  It faithfully represents the person, while introducing historical or geographic elements that add spice and adventure.  The illustrated portrait is an exciting way to make a portrait more meaningful.


Ace Alan


I love painting people’s portraits.  When my illustration schedule allows, I try to paint at least one portrait a week.  This habit developed while in art school.

Head Study '08


However, I also love illustrating.  The challenge of telling a story and of recreating an era or a culture, which is far removed from our own, excites me.  I suppose this desire grew out of my family’s fascination with living history museums and national parks.  It seemed like every vacation my parents would pack my siblings and I into a cramped car and drive a day or so to find some historical spot.  One summer we traveled the Lincoln trail, visiting where he lived in Kentucky, Indiana, and Illinois.


Pocahontas Illustration


Historical Book Illustration


 The two pursuits are very different.  Painting portraits is very academic.  The finished painting must at least look like it’s subject.  Preferably, the painting will also carry something of the feeling or emotion of the person modeling.


Head Study '07


In contrast, illustrations are patched together.  The illustrator uses a book on European landscapes to understand what the Norwegian coast looks like, and googles the latest archaeological find on Scandinavian jewelry.  He may have a model pose as the subject, but he often will tweak the face and proportions to make the subject look more authentic.  The illustration has a message to deliver, and the artist sacrifices all for that message.


Treasured in Her Heart


The illustrated portrait is an amalgam of the two different crafts.  On one hand, the artist must carefully represent the person being painted.  On the other hand, both the artist and the client have the freedom to choose a different historical or cultural setting for the painting.  The person can even choose to set their portrait in a classic novel or fairy tale.

Self-Portrait as Mock Renaissance Artist

If you are interested in creating an illustrate portrait, email me at matthewsample2@gmail.com.

2010/03/23

Step-by-Step Sketch from Life

I have wanted to paint Alan now for at least a year.  One good reason: he sits real well.  Second reason: he carries on fascinating conversation while he is sitting.  So this is my step-by-step sketch of a dear friend. 


I quickly sketched his head shape to start off.  Unfortunately this looks more like Voltaire than Alan, but I took care of that later.


I sketched in the rest of his body and added the shading on his lower face.


Glasses next, and definition to the lower shaded area.


At this point I realized that his face was too low in his head and so I shifted his face up.


Clean up of the nose and a little forehead and chin work, too.


At this point I realized that I had skewed the whole figure.  Often artists will twist the figure without realizing it, but I try to eliminate all skew in my own work. 


Now I get to begin laying color down!


At this point I am playing with form through the use of warm and cool colors.


Whenever I paint, I am constantly refining edges, constantly trying to determine if the expression is right.


At a certain point I abandon all hope of a masterpiece and just try to finish the painting.  I enjoyed painting Alan very much and look forward to the next opportunity to sketch him.